COMPUTER लेबलों वाले संदेश दिखाए जा रहे हैं. सभी संदेश दिखाएं

शनिवार, 6 मार्च 2021

Microsoft Excel / Excel / MS Office

 Microsoft Excel 
siddhant educational

Microsoft Excel / Excel / MS Office 


Introduction 

Excel is a window based is a product  sheet which is a product of corporation. It is used to track and analyzes numeric data record and calculated data and presents it in extracting manners.

Work book 

A file in excel it is known as work book. This meeting large amount of data a work is a collection of work sheet running from 1 to 225.


Deleting a cell 

To delete cell from the work sheet follow these step.

  • Select the cell you want to delete.
  • Right click on the selected cell and choose delete option. 
  • Select either shift cell up or shift cells and click in ok button.
Inserting cell

  • Select the cell where new cell are required right click on the selected cell and choose insert option.
  • Select either shift cell down or shift cell right click ok.
Function 

Function is a especial formula that perform calculation and specific task in a particular order or structure on the value supply it. These values are known as arguments.

Arguments 

Argument are value supplied to function to work upon these values can be numbers text data values logical cell reference constant value and any function are formula.

                       =sum(A1:A5, A7)
sum- function name 
(A1:A5, A7) - Arguments 

Function categories 
  • Mathematical function, Statistical function, Financial function 
  • Logical function, Data and Time function 
Formula 


Statistical function

Excel supports the following use full statistical function.

1. Average function 

It is use to return the average of given range of cells. 
Ex - =average(A1:D1)

2. Max function 

 Return the largest no within the range.
Ex- =max (A2:D2)

3. Min function 

Return the smalls no within the range. 
Ex - =min (A2:D2)

4. Count function 

Counts the no or argument within the range. It does not count non numeric and blank cells.

5. Count if function 

Count the specific value within the range. 

Logical function 

1. AND 

Return the true if all the argument are true.
Ex - = and(C2>16, D2>16, E2>16)

2. OR 

Return true if any argument is true.
Ex- = or(C2>16, D2>16, E2>16)

3. Not 

Return true if it argument are flase.
Ex - = not(G2<=60)

4. If 

 If text condition and return.
Ex - = if (G2>60,"good","poor")

Financial function

Excel support the three important financial functions.

1. Future value (FV)

It is use to calculate the future value of given series of amount, rate of interest at the number of terms. 

2. Present value (PV) 

This function is use to calculation  the payment mode for a lone. It requires loan amount interest rate and term. 

3. Payment (PMT) 

This  function is use to calculate the payment mode for a lone. It requires loan amount interest rate and term.


Date and time function 


रविवार, 14 फ़रवरी 2021

MS Powerpoint full notes

MS Powerpoint full notes

MS Powerpoint full notes


MS PowerPoint is a presentation program.
Inserting a new slide 

1. Select the slide that you want to insert.
2. Click on the home tab.
3. Click the new slide button. You see a drop down list of slide layouts.
4. Select the slide layout.

Creating a duplicate side 

1. Select the slide. You want to duplicate.
2. Click on the home tab.
3. Click the new slide button. Open the drop down list.
4. Click the duplicate selected slide option.

Selecting a different layout for a slide 

1. Click on the home tab.
2. Click the layout button and choose a layout on the drop down list.

Changing views 

1. Click the view button - Normal, slide sorter, slide show.
2. On the status bar to change views.

Moving sides 

Click the slide you selected and drag them to a new location.

Selecting a theme

1. Click on the design tab. 
2. Open the themes gallery and  move the pointer over different themes to "live preview" them.
3. Click a theme to selected.

Choosing a new set of colors

1. Click on the design tab.
2. Then click on the colors button. 
3. Slide the pointer over the different colors sets on the drop down list and see what effect they have on your slides.

Change theme effect 

1. Click on the design tab.
2. Click the font button and choose a font combination on the drop down list.

Filling a text box with a color style

1. Click on the format tab.
2. Choose a style on the shape style gallery.

 Rotating a text box 

Drag the rotation handle, the green circle above the text box.

Speaker notes

The speaker notes are speaking that consist of an image of each slide together with any notes that you need for that slide the notes are visual to the ordinance.

Media clips 

The media clips include sound animation and video clips you may want to insert into your presentation.

Organization chart

You can use or chart in a presentation to visually display the structure of a company organization or even a concept design.

Web pages 

Presentation slide are perfect for generating web page you can save your presentation as an html document ready for use on the world wide web (www) hyper text markup language.

Changing slide layout 

You can change the layout of any slide by using the following step.
1. Select the slide which layout you want to change.
2. On the home panel click on the layout button to display the list of layout.
3. Select any layout from the list.

Hiding a slide 

1. Select the slide which you want to hide.
2. Open the slide show panel and click on hide/show button.

Slide transition 

1. Select the slide on which you want to apply transition.
2. Click on a animation panel and select any transition effect from the transition list.
3. Set the transition speed slow, medium and fast.
4. Select the transition event on mouse click automatically.
5. Set the time in second if you have choose automatically.
6. If you want to apply these effect on all slide click at apply to all button.

Custom animation

1. Select the object you want to animation.
2. On the animation panel click on custom animation button.
3. This will display the custom animation window click on add new effect button to display the effect category.
4. Select any effect from the category of the effect.
5. Set the speed of animation from the speed list box.
6. Select animation event on mouse click after previous or with previous.
7. Click on the test button (play) to see the effect.

Inserting animation picture 
 
1. Select the slide.
2. On the insert panel click movie drop down arrow button.
3. Select movie from clip organization options.
4. Select a picture and drag it on to your slide.

हिंदी के बारे में एक नजर

संज्ञा          सर्वनाम         कारक                विशेषण              उपसर्ग           प्रत्यय             क्रिया         वाच्य

विज्ञान के बारे में एक नजर

जंतुओं का वैज्ञानिक नाम    कोशिका और उसके अंग     कोशिका भित्ति    प्रोकैरियोटिक कोशिका         मात्रक          एक समान वृत्तीय गति        गैलीलियो का नियम     जड़त्व का नियम         संवेग संरक्षण का सिद्धान्त    अभिकेंद्रीय बल         कार्य, ऊर्जा एवं शक्ति की परिभाषा     गुरुत्वाकर्षण     पलायन वेग     कक्षीय वेग         दाब की परिभाषा         बैरोमीटर    पास्कल का नियम     प्लवन के नियन

इतिहास के बारे में एक नजर 


भूगोल के बारे में एक नजर


पठार      चट्टानें         ज्वालामुखी         भूकम्प          पर्वत          


Shailesh Kumar 
        M.Sc, B.Ed 

गुरुवार, 28 जनवरी 2021

Microsoft Word full Notes

Microsoft   Word  full Notes 

Microsoft   Word  full Notes 


Defination 

MS office is basically a collection of the package of all those important  software which are required for performing all types of official work.
The application all software  which comes under package of ms office is as follows.
Microsoft Word
Microsoft Excel 
Microsoft Power point
Microsoft Access
Microsoft One note
Microsoft Outlook 
Microsoft Publisher

Microsoft Word

Introduction

The first and the most important application of ms office package is ms word. MS word is used on a computer system for performing all types of typing related work such as typing an application a letter, a notice, a invitation all complete document.

Starting an office program- 

  • Click on start button.
  • Choose all program. 
  • Click on Microsoft office.
  • Then choose the program's name on the sub-menu.
Title bar

On the top of window the bar is available which is known as title bar.

On the left hand side of the title bar the name of the application and on the right hand side of the title bar three control button.

  1. Minimize 
  2. Maximize 
  3. Close button
Menu bar

Just billow the title bar a very important bar is available which is known as the menu bar.

Save a file- Ctrl + S
Opening a file - Ctrl + O

Locking a file with a password 
  1. Go to the file tab.
  2. Click the prepare document button and choose Encrypt document option.
  3. Enter as password in the password text box and click OK.
  4. Enter the password again in the password dialog box.
  5. Click OK.


Removing password
  1. Open the file that needs its password removed.
  2. Go to the file tab. 
  3. Click the prepare document button and choose Encrypt document option.
  4. Delete the password and click OK.

Selecting text

  TO SELECT                   DO THIS                             
  A word                             Double click the word
  A few words                     Drag over the words
  A paragraph                      Triple click inside the paragraph
  All text                              Press Ctrl + A                           

Cut - Ctrl + X
Copy - Ctrl + C
Paste - Ctrl + V
Deleting text- Select the text and press the delete key.
Choosing fonts- Ctrl + Shift + F
Changing the font size -  Ctrl + Shift + P
Grow font - Ctrl + ]
Shrink font - Ctrl + [
Bold - Ctrl + B
Italic - Ctrl + I
Under line - Ctrl + U
Subscript - Ctrl + =
Superscript - Ctrl + Shift + =

Changing Case  

  1. Select the text.
  2. On the home panel click on change case option.
  3. From the list select desired case.
Case are five type.

Sentence case
lower case
UPPER CASE 
Capitalize Each Word 
tOGGLE cASE

Finding a word 

You want to find a particular word in your document in use find option.

  1. Click on home panel then choose find option.
  2. Find box display on the screen.
  3. Type the which word you want to find in find what box.
  4. Click on find button.
SIDDHANT COMPUTER EDUCATION CENTER ETAWAH

Replace text 

You can change a particular word with new word to use the replace option.

  1. Click on replace option in the home panel.
  2. The replace dialog box appear.
  3. Type the which word you want to change and type a new word you want to display.
  4. Click on replace all button.

Opening Auto Correct dialog box 

  1. Click on the file tab then choose words options.
  2. You see the options dialog box.
  3. Go to the proofing category.
  4. Click the auto correct options button.
  5. Click the auto correct tab.
  6. Auto correct tab lists words that are corrected automatically. Scroll down the replace list and have a look around.

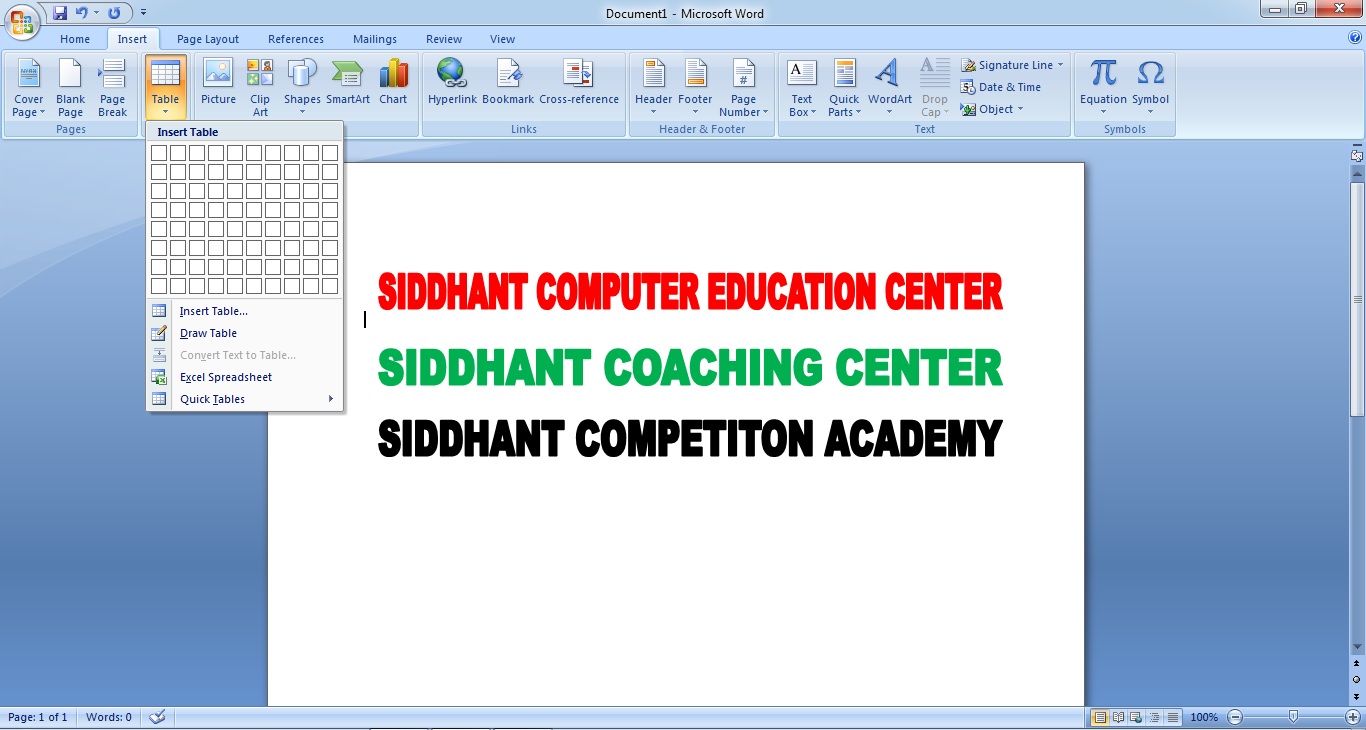
TABLES


In word  we create tables easily. The  tables facility in word is powerful and flexible.
Table can have any number of rows and columns.
  1. Drag on table
  2. Draw a table 
  3. Create a quick table 
  4. Insert table 
  5. Convert text in a list into a table 
MERGING AND SPLITTING

Merging cells

Merge cells to break down the barriers between cells and join them into one cell.

  1. Select the cells you want to merge.
  2. Go to the layout tab.
  3. Click the merge cells button.

Splitting cells  

Split cells to divide a single cell into several cells.

  1. Selected the cells you want to split. 
  2. Go to the layout tab.
  3. Click the split cells button.

CHARTS

Creating a chart 

  1. Go to the insert tab.
  2. If you are working in excel, select the data you will use to generate the chart. 
  3. Click on the chart option.
  4. Select a chart drop down list then click OK.

Inserting a picture 

  1. Select your chart.
  2. Click on the format tab.
  3. Click on the shape fill option.
  4. Choose picture fill option on the drop down list. you will see the insert picture dialog box.
  5. Locate the picture you need and select it.
  6. Click the insert button.
SMART ART


Create a diagram

  1. Click on the insert tab then click the smart art button. You will see the choose a smart art graphic dialog box.
  2. Select a diagram. Diagram are divided into eight categories.
  3. Click OK.

Inserting a shapes 

Insert a shape in your document to provide a better look.

Inserting word art 

You can add a word art in your document by selecting the word art option.


Character spacing and line spacing 

You can save the spacing between character and line.

Creating bullet and numbering 

You can insert a symbol in starting a line and you can add line number. You can use bullet and number option.

Adding a water mark 

A water mark to a text or desire that appear behind the text water mark all the page in your document.

  1. Picture watermark
  2. Text watermark


Changing the page orientation

There are two type orientation.

  1. Portrait 
  2. Landscape

Inserting header and footer

You may want to include information such as title of the document on every page of the document header is appear top of the page and footer appear bottom of the page.


Spelling  and grammar

  1. Type sentence with grammatical mistake.
  2. Click on review panel then choose spelling and grammar option.
  3. The spelling and grammar box display select the correct spelling in the box and click on change button.


Counting  word 

  1. Click on review panel then choose word count option.
  2. The word count box sow the details.

Counting  word 


    Inserting caption

    You may want to insert figure or table name you can use caption option.

    1. Select the figure or table which you want to insert caption.
    2. Click on reference panel then choose insert caption option. 
    3. The caption box open type the figure name and click OK.

    Inserting table of figure

    1. Place the pointer on the location where you want to insert.
    2. Click on reference panel then choose insert table or figure option.
    3. Select any style and click on OK button.

    Mail merge 

    1. Make the main document active window click on the mailing panel.
    2. Click on the start mail merge button.
    3. Then choose step by step mail merge wizard.
    4. This will display the mail merge dialog box select the letter option click on next button.
    5. Select use option then click on next button.
    6. Select use an existing list option choose browse.
    7. Now select your data source file name and open the data source dialog box.
    8. In the main document position the cursor you want to insert field.
    9. Click on the insert merge mail button and choose the first field from the list.
    10. Similarity insert all the field at appropriate place.
    11. After inserting the field click om review button.
    12. Now choose finish mail merge option and choose editing individual option.

    हिंदी के बारे में एक नजर

    संज्ञा          सर्वनाम         कारक                विशेषण              उपसर्ग           प्रत्यय             क्रिया         वाच्य

    विज्ञान के बारे में एक नजर

    जंतुओं का वैज्ञानिक नाम    कोशिका और उसके अंग     कोशिका भित्ति    प्रोकैरियोटिक कोशिका         मात्रक          एक समान वृत्तीय गति        गैलीलियो का नियम     जड़त्व का नियम         संवेग संरक्षण का सिद्धान्त    अभिकेंद्रीय बल         कार्य, ऊर्जा एवं शक्ति की परिभाषा     गुरुत्वाकर्षण     पलायन वेग     कक्षीय वेग         दाब की परिभाषा         बैरोमीटर    पास्कल का नियम     प्लवन के नियन

    इतिहास के बारे में एक नजर 


    भूगोल के बारे में एक नजर


    पठार      चट्टानें         ज्वालामुखी         भूकम्प          पर्वत          


    Shailesh Kumar 
            M.Sc, B.Ed